 Posts
Posts


1.Multi level
2.Easy to customize
3.Professional Desgin
4.All browser computability
5.Wide range navigation
Here I'll show you how to add a horizontal menu like the one I added to my blog.
Step 1:Login into Blogger>Edit Html
Find ]]></b:skin>
Paste the Below code just before that
/* Start Multi Level Menu From www.techtasks.blogspot.com */
#NavbarMenu {
background: #555 url(http://lh5.ggpht.com/_-A4vw5BwqxA/SpwvqufKoZI/AAAAAAAADtE/L1jkxjUVoiw/navbar.png); /* Menu color or image */
width: 100%;
height: 35px;
color: #FFF;
margin: 0;
padding: 0;
font: bold 12px Arial, Tahoma, Verdana;
float:left;
}
#nav {
margin: 0;
padding: 0;
}
#nav ul {
float: left;
list-style: none;
margin: 0;
padding: 0;
}
#nav li {
list-style: none;
margin: 0;
padding: 0;
}
#nav li a, #nav li a:link, #nav li a:visited {
color: #FFF;
display: block;
margin: 0;
padding: 9px 15px 8px;
font: bold 16px Georgia, Times New Roman;
}
#nav li a:hover, #nav li a:active {
background: #555 url(http://lh6.ggpht.com/_-A4vw5BwqxA/Spwvq2dayoI/AAAAAAAADtI/PrAithTFsr0/navhov.png); /* Menu Mouse over color or image */
color: #FFF;
margin: 0;
padding: 9px 15px 8px;
text-decoration: none;
}
#nav li li a, #nav li li a:link, #nav li li a:visited {
background: #555;
width: 150px;
color: #FFF;
float: none;
margin: 0;
padding: 7px 10px;
border-bottom: 1px solid #FFF;
border-left: 1px solid #FFF;
border-right: 1px solid #FFF;
font: normal 14px Georgia, Times New Roman;
}
#nav li li a:hover, #nav li li a:active {
background: #0080FF; /* sub Menu Mouse over color */
color: #FFF;
padding: 7px 10px;
}
#nav li {
float: left;
padding: 0;
}
#nav li ul {
z-index: 9999;
position: absolute;
left: -999em;
height: auto;
width: 170px;
margin: 0;
padding: 0;
}
#nav li ul a {
width: 140px;
}
#nav li ul ul {
margin: -32px 0 0 171px;
}
#nav li:hover ul ul, #nav li:hover ul ul ul, #nav li.sfhover ul ul, #nav li.sfhover ul ul ul {
left: -999em;
}
#nav li:hover ul, #nav li li:hover ul, #nav li li li:hover ul, #nav li.sfhover ul, #nav li li.sfhover ul, #nav li li li.sfhover ul {
left: auto;
}
#nav li:hover, #nav li.sfhover {
position: static;
}
/* End Multi Level Menu From www.techtasks.blogspot.com */
Customizing the menu by changing the following color code
#0080FF; (light Blue) Sub Menu Over color.
For customizing completely just follow the comments in the above code...
Step 2:
1. If you are a Basic user or to add some where in blog(not at Below or top of the Header) just Follow these steps
Go to >> page elements
Then find the place where u want to add the Navigation Menu ...
Add Gadget >> select HTML/Javascript >>
Paste the following code in the content box.
2.If you want to add the Navigation menu top or below of header just follow these steps
2.1Go to >> Layout >> Edit HtTML >>
2.2Scroll Down of Find(CTRL+F) the following code....
<b:section class='header' id='header' maxwidgets='1' showaddelement='no'>
2.3Replace above code with the following
<b:section class='header' id='header' maxwidgets='2' showaddelement='yes'>
2.4To change the position(Top or Below of Header) of Navigation menu find the following code(generally it is the next line of above code)
<b:widget id='Header1' locked='true' title='Test Blog (Header)' type='Header' />
Change locked='true' to locked='false'
2.5Save the Template
2.6 Go To >>Layout >> Page Elements >>
you find here 'Add a Gadget' just above the Header
Add a Gadget >> HTML/JavaScript >> paste following code in the content box....
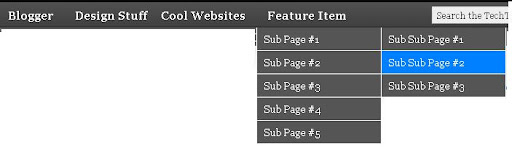
<div id='NavbarMenu'>
<ul id='nav'>
<li><a href='#'>Blogger</a>
<ul>
<li><a href='#'>Blogger Widgets</a></li>
<li><a href='#'>Blogger Hacks</a></li>
</ul>
</li>
<li><a href='#'>Design Stuff</a>
<ul>
<li><a href='#'>Icons</a></li>
<li><a href='#'>JavaScript</a></li>
<li><a href='#'>CSS</a></li>
</ul>
</li>
<li><a href='#'>Adobe Flex</a></li>
<li><a href='#'>Cool Websites</a></li>
<li>
<a href='#'>Feature Item</a>
<ul>
<li>
<a href='#'>Sub Page #1</a>
<ul>
<li><a href='#'>Sub Sub Page #1</a></li>
<li><a href='#'>Sub Sub Page #2</a></li>
<li><a href='#'>Sub Sub Page #3</a></li>
</ul>
</li>
<li><a href='#'>Sub Page #2</a></li>
<li><a href='#'>Sub Page #3</a></li>
<li><a href='#'>Sub Page #4</a></li>
<li><a href='#'>Sub Page #5</a></li>
</ul>
</li>
</ul>
</div>
Step 3:You can arrange it below the header by dragging it below the title.
Step 4:Finally save and Check the blog.
I Hope you love the post...Subscribe Me or Share It


5 comments:
It isn't working! The thing works but when I want to access the submenus, it doesn't work.
Find it at:
http://www.coupons.freebie-link.com/
@Chris
i check the site in all Browsers, it's working great ....
Thanks for your help! I've tried messing around with this for weeks now, and yours is the first code to work properly...
I tried it but its not working. Pls help
Wonderful blog! I found it while searching on Yahoo News.
Do you have any suggestions on how to get listed in Yahoo News?
I've been trying for a while but I never seem to get there!
Thanks
Respects for your's Questions & Opinions